Varlamore Overview Guide OSRS

Varlamore Overview Guide OSRS
Welcome to your comprehensive guide on everything Varlamore! This post serves as your all-in-one resource to quickly catch up on and refresh your memory regarding the exciting additions coming with Varlamore's inaugural content release. Brace yourself for thrilling boss encounters, enticing rewards, and never-before-seen skilling activities.
Old School RuneScape's latest expansion introduces the majestic Shining Kingdom of Varlamore, unfurling a new realm to the south of Kourend and Kebos. This vibrant region is teeming with diverse content that caters to the interests of lore enthusiasts, dedicated PvMers, and skill-focused players alike.
Does VIRTGOLD offer Powerleveling Services for me?
Yes! In fact, our team of expert Powerlevelers has mastered every inch of efficient OSRS training methods, and we're ready to help you accomplish the same feat. Whether you're a seasoned adventurer or just starting out, our personalized approach ensures that you'll receive the most affordable prices and most skilled workers to come out on top. So why wait? Take on the grind of OSRS with confidence, thanks to VIRTGOLD. Want to skip the grind all together? Consider our other services such as Currency and Questing!

The New Kingdom: Civitas illa Fortis and Beyond

Prepare to be captivated as Varlamore unfolds its grandeur, starting with the heart of the expansion – Civitas illa Fortis, the bustling capital that awaits your exploration. This vibrant city serves as a nexus for trade, transportation, and daring adventures. Here, you'll encounter not only the formidable Queen Zyanyi but also her loyal Kualti guards, adding an air of majesty and intrigue to your journey.
Avium Savannah – Nature's Bounty
Venture beyond Civitas illa Fortis, and you'll find yourself in the Avium Savannah – a flourishing landscape teeming with exotic creatures and critters not seen anywhere else. Explore the untamed wilderness, encounter unique fauna, and discover the mysteries hidden within this vibrant ecosystem.
Cam Torum – The Dwarven Enclave
Your journey takes a final turn as you arrive at the ancient dwarven town of Cam Torum, nestled deep into the stony face of Ralos’ Rise. This town, with its rich history and resilient architecture, offers a stark contrast to the bustling city life. Delve into the depths of Cam Torum, uncovering the secrets and lore that the dwarven inhabitants have guarded for generations.
Fortis Colosseum: A Grand Arena of Challenges and Glory

Situated on the southeastern shores of Varlamore, the radiant capital city, Civitas illa Fortis, proudly boasts its crowning jewel - the Fortis Colosseum. This monumental arena stands as the city's defining feature, beckoning adventurers to partake in a thrilling, wave-based PvM minigame that promises not only battles of escalating complexity but also the chance to revel in glory.
The Epic Battle Arena:
1. Wave-Based PvM Minigame: The Fortis Colosseum sets the stage for an epic wave-based PvM minigame, challenging the bravest warriors with increasingly intricate waves of enemies. Whether you're a seasoned combatant or a Fire Cape owner, be prepared to face combinations of foes that will test your skills to the limit.
2. Risk and Reward: As the difficulty ramps up, so do the stakes. After each wave, a choice awaits you – leave with the loot you've earned or risk it all in the pursuit of greater glory. The Fortis Colosseum is not just about victory; it's about putting on a show that leaves the crowds in awe.
Dynamic Challenges and Varied Gameplay:
1. Continuous Improvement: The Fortis Colosseum is designed to be a journey of continuous improvement. With randomizing enemy spawn locations and slight variations in the types of enemies encountered, each run promises a unique challenge that keeps you coming back for more.
2. Choose Your Destiny: Between waves, players face a crucial decision – select from a range of modifiers that tilt the odds against you while empowering your opponents. Balancing increasingly tricky waves with chosen modifiers adds a strategic layer to the gameplay, with riskier modifiers offering greater Glory gains.
Prepare for a spectacle like no other as you step into the Fortis Colosseum, where risk, reward, and the roar of the crowd converge in an unforgettable display of combat prowess and showmanship. The arena awaits, champion – will you rise to the challenge?
Rewards:
Embarking on the daring trials within the Fortis Colosseum brings forth a trove of unique and powerful rewards, each designed to enrich your adventures in this grand arena. Here's a closer look at the treasures that await the champions:
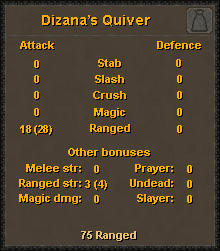
Dizana's Quiver
A Cape-slot offering, Dizana's Quiver stands as an untradeable, chargeable (and corruptible) masterpiece. Sporting higher offensive bonuses than Ava's Assembler, it boasts a distinctive ability to hold at least two types of ammo, automatically selecting the applicable type based on your current weapon. Earn this prestigious quiver by conquering the challenges of the Colosseum.
- Charged Ammo: When charged, bolts and arrows fired from the quiver gain an additional +1 Ranged Strength and +10 Ranged accuracy. Embrace the enhanced power and precision offered by this formidable quiver.
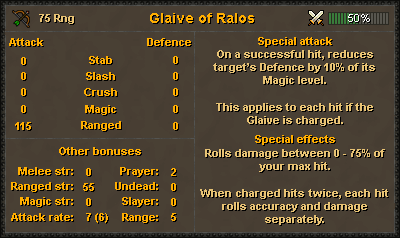
Glaive of Ralos
Introducing a new weapon category, the one-handed, chargeable Glaive of Ralos adds a unique twist to combat. Thrown with the ability to bounce back to the wielder after each hit, uncharged throws deal 0-75% of your maximum hit. However, when charged, the glaive delivers two hitsplats, each rolling its own accuracy and damage (0-75% of your maximum hit).
- Special Attack: Spend 50% Special Attack Energy to drain the target's Defence level by 10% of their Magic level on successful hits. The Glaive of Ralos offers a dynamic and strategic addition to your arsenal.
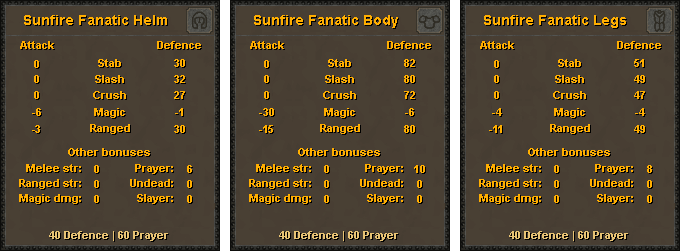
Sunfire Fanatic Armour
For those who appreciate simplicity, the Sunfire Fanatic Armour provides a powerful upgrade to the iconic Proselyte set. Boasting bigger numbers, each piece requires 60 Prayer and 40 Defence. The tradeable set offers +2 Prayer bonus over its Proselyte equivalent, along with defensive bonuses akin to Rune armour.
Sunfire Splinters
Regularly acquired during Colosseum runs, Sunfire Splinters serve as a versatile resource. Not only do they charge the Glaive of Ralos and Dizana's Quiver, but they also play a crucial role in crafting Sunfire Runes.
Sunfire Runes
Crafted at the Sunfire Altar in Varlamore using Sunfire Splinters, Rune Essence, and regular Fire Runes, Sunfire Runes present a unique twist to the traditional Rune formula. Crafted amounts scale with your Runecraft level, and they count as Fire Runes when casting spells. Using a Sunfire Rune adds a 10% minimum hit to the spell.
- Searing Pages: Combine Sunfire runes or dust with Burnt pages to create Searing pages. These pages, when used with the Tome of Fire, impart the additional 10% minimum hit that Sunfire runes offer. Customize your magical arsenal and unleash the power of the Sunfire with these enchanting pages.
Varlamore's rewards are not just about numbers; they offer dynamic gameplay enhancements, strategic choices, and a touch of divine power. Champions, ready yourselves for the trials ahead – fame, glory, and powerful artifacts await those who prove their mettle in the Fortis Colosseum!


Perilous Moons: Unearth the Secrets Below Cam Torum
Venture into the depths beneath the mighty cliffs of Ralos’ Rise, where the resilient dwarven town of Cam Torum faces a new and perilous challenge. An ancient temple, originally constructed to imprison powerful entities, has been disturbed, unleashing strange beings upon the town's inhabitants. Your assistance is needed to contain these mystical threats, leading to the discovery of a gripping new PvM adventure tailored for mid-level players.
The Quest Unveiled:
Embark on a quest that not only unveils a thrilling chunk of PvM content but also delves into Varlamore's ancient history. Inspired by the iconic Barrows Brothers, this mid-level combat experience focuses on exploration and discovery. Prepare for a journey of progress, where each step through the dungeon reveals more about the mysteries that lie beneath Cam Torum's surface.
Dungeon Exploration:
1. Starting Point: The central room serves as the beginning of every temple journey, expanding into four ominous corridors, each leading to different areas of the dungeon. However, only one corridor is accessible during each visit, adding an element of unpredictability to each encounter.
2. Dynamic Encounters: Traverse through various rooms, each offering unique enemies to face, shortcuts to navigate, and opportunities to showcase your skill levels. Acquire food and Prayer restoration items within the temple to replenish your supplies between battles. While these items cannot leave the temple, they prove invaluable for sustained exploration.
3. Resource Management: Although the temple appears abandoned for centuries, it houses essential resources for your journey. Defeat foes for drops such as bones and herbs, and earn XP for your victories. Base camps scattered throughout the dungeon allow you to store and retrieve tools for gathering skills like Hunter and Fishing, ensuring you're always prepared.
Facing the Demi-Bosses:

1. Strategic Choices: After exploring and shoring up supplies, the time comes to confront the three deadly demi-bosses lurking in the temple's depths. Tackle them in any order you prefer, with the option to focus on the one closest to your starting location for efficiency.
2. Combat Preparation: With a recommended combat level of 75 or higher, defense becomes crucial in the depths of the dungeon. Prepare carefully, as each encounter promises unique challenges that demand strategic thinking and combat prowess.
Note: Unlike the Barrows Brothers, these demi-bosses can be fought by multiple players at the same time. Without dropping any spoilers, these powerful entities cannot be killed – your job is to distract them to ensure they remain contained within the temple.
Prepare for the challenges that await, as you descend into the mysterious temple below Cam Torum, where history, danger, and adventure converge in the Perilous Moons quest. The fate of the dwarven town rests in your hands!
Rewards

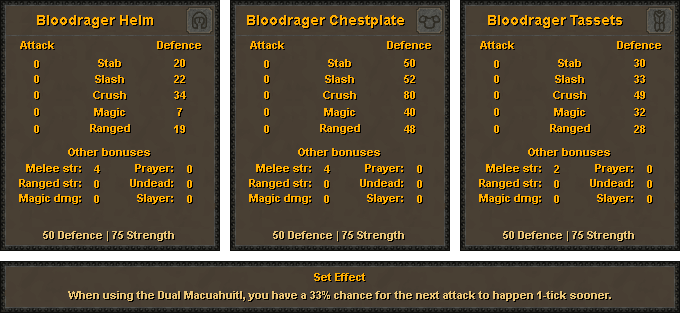
Bloodrager Set:
Harness the primal power of the angriest phase of the moon with the Bloodrager Set, an ensemble that taps into ancient bloodlust, propelling the wearer into a ferocious and devastating assault against low-defense targets.
Bloodrager Set Components:
1. Dual Macuahuitl:
- Speedy Assault: With a swift attack rate of 4 ticks, the Dual Macuahuitl strikes fear into your foes.
- Dual Strikes: These formidable weapons deliver a unique twist—they hit twice with each attack, ensuring a relentless onslaught.
2. Special Attack:
- Risky Power: The Dual Macuahuitl's Special Attack allows you to sacrifice 10% of your current Hitpoints to elevate both your maximum and minimum hit by 25% for that specific attack.
- Energy Cost: At a mere 25% energy cost, the Special Attack appears tempting, but be cautious. Repeated use in quick succession may lead to a perilously low HP.
3. Set Effect:
- Enhanced Speed: Wearing the full Bloodrager Set unlocks a nifty Set Effect— a 33% chance for the Dual Macuahuitl’s second attack to hit one tick sooner.
- Guaranteed Speed: Activate the Special Attack with the full set equipped, and the Set Effect transforms into a guarantee, enabling unparalleled slicing and dicing at lightning speed.
Wielding the Fury:
The Bloodrager Set invokes a state of uncontrollable fury, turning the wearer into a whirlwind of destruction against less-defended adversaries. With the Dual Macuahuitl and its dual strikes, coupled with a strategic Special Attack, you become a force to be reckoned with on the battlefield.
Tactical Considerations:
- Balancing Act: The Special Attack offers increased power at the cost of Hitpoints. Exercise strategic judgment to optimize its use without endangering your character.
- Set Synergy: Equipping the full Bloodrager Set enhances your combat capabilities, providing not only increased speed but also a guaranteed acceleration of the Dual Macuahuitl's second attack when utilizing the Special Attack.
Unleash the Bloodrager:
In the heart of battle, under the wrathful gaze of the angriest moon, the Bloodrager Set transforms you into a relentless warrior, tearing through enemies with unmatched speed and ferocity. Embrace the power of the set, but wield it wisely, for the fury it unlocks demands both strength and strategy.

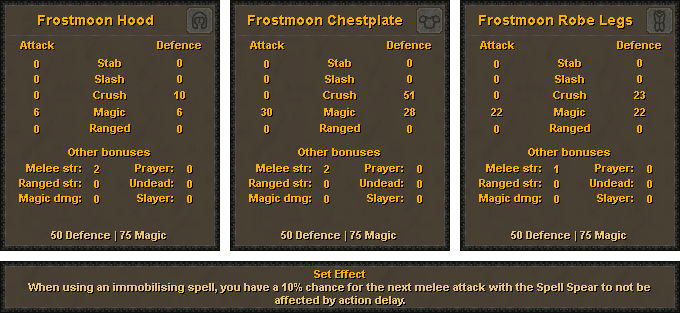
Frostmoon Set:
Banish the blues with the Frostmoon Set, a formidable combination of Melee and Magic prowess that freezes enemies in their tracks. This midgame set is designed for those who seek both offensive and defensive capabilities, offering strong Magic accuracy and resilience against Magic and Crush styles.
Frostmoon Set Components:
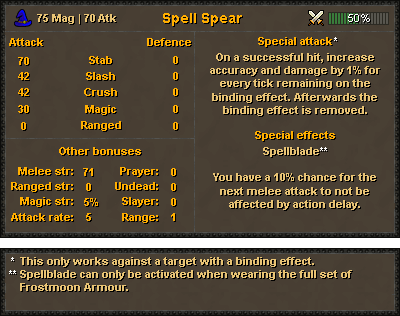
1. Spell Spear:
- Versatile Weaponry: The Spell Spear, a melee weapon of exceptional power, surpasses the standard staff in damage output. Remarkably, it allows you to auto-cast spells of your choice.
- Magic Strength Boost: With a 5% increase in Magic strength, the Spell Spear becomes a devastating tool, freezing enemies and dealing significant damage.
2. Frostmoon Armour:
- Versatility: The set combines both Melee and Magic focus, ensuring that your offensive and defensive needs are met in battle.
- Magic Accuracy: Enjoy heightened Magic accuracy compared to other midgame sets, giving you an edge in magical combat.
3. Set Effect:
- Unfazed Assault: The Frostmoon armour's set effect grants a 10% chance for your next melee attack with the Spell Spear to be unaffected by any action delay. Note that this effect is exclusive to attacks made with the Spell Spear.
Spell Spear's Special Attack:
1. Damage Amplification: The Spell Spear's Special Attack intensifies your assault, increasing your max hit by 1% for every tick remaining on a target inflicted with a binding effect.
2. Tactical Precision: Choose your moment wisely, as the binding effect is removed after delivering the deadly blow. Plan your attacks strategically to maximize the damage amplification.
Tactical Considerations:
- Dual Capability: The Frostmoon Set seamlessly integrates both Melee and Magic capabilities, providing versatility in combat situations.
- Strategic Auto-casting: Utilize the Spell Spear's ability to auto-cast spells of your choice to create a customized and effective combat style.
Embrace the Chill of Power:
In the midst of battle, the Frostmoon Set envelops you in an icy aura, empowering your attacks with both magical precision and brutal melee force. Equip the Spell Spear, cast your spells, and revel in the set's unique set effect as you become a formidable force on the battlefield. Unleash the chill of power and command both Melee and Magic with the Frostmoon Set!
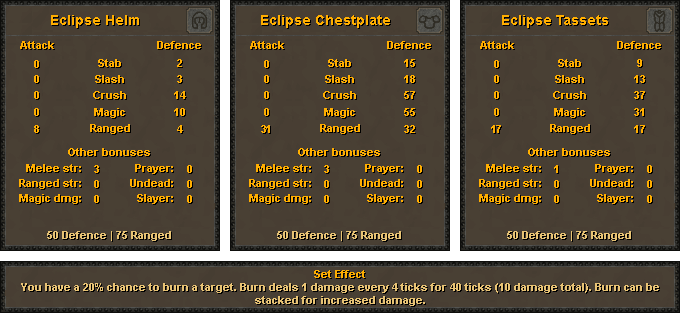
Eclipse Set:
Embark on a celestial journey to the all-consuming maw of the Eclipse with this deadly hybrid set. Eclipse seamlessly blends the precision of Ranged attacks with the ferocity of up-close-and-personal melee carnage. Burn your foes and harness the power of fire to unleash a devastating flurry of flames, creating a lethal offense at the expense of defensive capabilities.
Eclipse Set Components:
1. Eclipse Atlatl:
- Ranged Menace: The Eclipse Atlatl, a new Ranged weapon, boasts an attack speed of 4 (3 on Rapid) and derives its damage from your Melee Strength, creating a unique and deadly combination.
2. Set Effect:
- Infernal Burn: The Eclipse Set's unique Set Effect grants the wearer a 20% chance to inflict Burn on the target. This new effect causes the target to suffer 1 point of damage every 4 ticks for 40 ticks, resulting in a total of 10 base damage. The Burn effect can be stacked up to five times, amplifying the damage over time.
Eclipse Atlatl's Special Attack:
1. Consuming Flames: The Eclipse Atlatl's Special Attack demands 50% Special Attack energy and consumes any remaining Burn damage on the target.
2. Deadly Boost: The Special Attack increases your max hit by the consumed Burn damage and your minimum hit by half of that amount. While this offers a massive boost, it is capped at an additional 50 damage, preventing the unleashing of uncontrollable infernos.
Tactical Considerations:
- Hybrid Offense: Eclipse excels at combining Ranged accuracy and Melee strength, offering a deadly offensive strategy. However, be mindful of the trade-off in defensive capabilities.
- Burn Stacking: Leverage the Burn effect strategically, stacking it up to five times for increased damage over time. Explore various tactics to maximize the potential of this infernal debuff.
Embrace the Celestial Carnage:
The Eclipse Set transforms you into a celestial warrior, wielding the Eclipse Atlatl to deliver precise Ranged attacks intertwined with the fiery devastation of Melee combat. Inflict Burn upon your foes, stack the flames strategically, and unleash a relentless assault with the Atlatl's Special Attack. Embrace the celestial carnage and let the power of the Eclipse consume your enemies!

Hunters Guild
Welcome to the Hunters Guild, a haven for those seeking the bounties of the rich lands within the Avium Savannah. Nestled just outside Civitas Illa Fortis, this purpose-built shelter offers amenities and opportunities for hunters with a minimum skill level of 46. The vast landscapes are home to diverse creatures, and hunters can embark on quests known as Rumours, reminiscent of Slayer tasks or Farming Contracts, to track down and hunt these creatures for rewards.
Hunters' Rumours:
1. Diverse Challenges: Hunters in the guild share whispers of creatures across Gielinor, introducing a variety of tasks suitable for different Hunter levels.
2. Rumour Tiers: Rumours are categorized into four tiers, starting at Tier 1 (46 Hunter) and progressing to Tier 4 (91 Hunter). Each hunter at the bar presents a different Rumour, catering to varying skill levels.
3. Rumour Rotation: Hunters can choose a Rumour to investigate, aiming to obtain a special Rare Creature Part to complete the task. If unsatisfied with the available Rumours, hunters can trade spare creature parts for a low-tier hunt to reset the options.
4. Rewards: Rare Creature Parts earned from completing Rumours can be traded for bonus XP drops and a Loot Sack containing valuable Hunter items, meats, furs, bones, and even Varlamore-specific items. There's a chance to obtain a Quetzel Whistle recharge, a Quetzal Pet, or the Hunter Skilling Outfit with a +2.5% catch rate and a 5% increased chance of obtaining Rare Creature Parts when worn as a set.
Quetzal Transport Network:
1. Quetzal Whistles: Guild members are issued Quetzal Whistles, enchanting tools that enable swift travel to the Guild from anywhere in Gielinor (excluding the Wilderness).
2. Whistle Tiers: There are three tiers of Quetzal Whistles—Basic, Enhanced (crafted from Yew), and Perfected (crafted from Redwood). Each tier has varying storage capacities for charges (5, 20, and 50, respectively).
3. Blueprints and Upgrades: After completing five Rumours of any level, the Quetzal Master in The Roost rewards hunters with Basic Whistle Blueprints. Enhanced and Perfected variants can be obtained as random drops from completing Rumours.
4. Customization: Hunters can customize the appearance of the quetzal that comes to pick them up, adding a personalized touch to their avian companions.
5. Varlamore Link: Unlock access to Varlamore via the Eagle's Transport system from the guild, facilitating seamless travel across the continent.
New Creatures:
Varlamore is home to all manner of creatures you’ve never seen before, and we can’t wait for you to meet them!
Moths
Just like Butterflies, these creatures are trapped using a Butterfly Net and Jar or your own hands with the right level, and allow you to bestow buffs on up to a random three players in a 3x3 radius around you with one of the following effects:
Sunlight Moth (65 Hunter): 6 + 20% of a player's reduced stats, as well as 8 Hitpoints.
Moonlight Moth (75 Hunter): 5 + 10% of a player's level in Prayer Points.
You can also use these creatures in Hunter’s Mixes, a tradeable two-dose AoE potion that has the same effect as the Moths. Not only do we want to extend this option to Butterflies too, to give them a bit more utility but we'd like to also change their mechanics to work just like Moths!
Antelope
Springy, agile and fast, these four-legged mammals can be found wandering the Avium Savannah and the Hunter Guild. Successfully hunting these creatures with a pitfall trap will provide you with meat and horns. These also have two variants:
Sunlight Antelope (72 Hunter): Sunlight Horns and Sunlight Meat
Moonlight Antelope (91 Hunter): Moonlight Horns and Moonlight Meat
Sunlight Horns can be used to upgrade the Hunter's Crossbow into the Sunlight Hunter's Crossbow and bolts for the upgraded version, while the Moonlight horns can be crafted into stronger ammunition specifically for the Sunlight Crossbow. More on that in a moment!
Jerboa
Requiring 39 Hunter to catch with a Box Trap, you can craft there tails into Hunter's Spears.
Fennec Foxes
These particular fluffy fellows can be caught in Varlamore, using 57 Hunter and a baited deadfall trap. They drop Fox Fur, Meat, and Bones.
Mountain Salamander
A new tier of Salamander that can be caught with the usual net method. They'll require 79 Hunter to catch and use new Irit Tar as ammunition which will give an additional +60 Ranged Strength. You’ll need 80 Attack/Ranged/Magic to wield these fiesty little fiends effectively.
Slash Attack: +77
Ranged Attack: +87
Strength Bonus: +91
Savor the Hunt:
Prepare your taste buds for a unique culinary experience as the gourmets at the Hunter Guild unveil a cooking method that transforms typical meats into flavorful delights. These enhanced meats not only provide a delayed healing effect over time but also offer a superior healing experience compared to traditional fish. Explore the rich variety of Hunter Meats and discover their delightful effects.
Hunter Meats and Food Overview
1. Healing Over Time (HoT):
- Meats offer a delayed healing effect that provides more HP than fish over an extended period.
- Combo-eat with items like Karambwan or Saradomin Brews to enjoy the benefits of both simultaneously.
2. Effect Variations:
- Some meats come with additional effects, enhancing their utility beyond traditional healing.
Meat Comparison:
| Fish | HP | Meat | HP | Additional | Total HP |
|---|---|---|---|---|---|
| Trout | 7 | Wild Kebbit | 5 | 3 | 8 |
| Salmon | 9 | Larupia | 7 | 4 | 11 |
| Tuna | 10 | Barbed Kebbit | 8 | 4 | 12 |
| Lobster | 12 | Graahk | 9 | 5 | 14 |
| Swordfish | 14 | Kyatt | 11 | 6 | 17 |
| Monkfish | 16 | Fox Meat | 13 | 6 | 19 |
| Karambwan | 18 | Sunlight Antelope Meat | 14 | 7 | 21 |
| Shark | 20 | Dashing Kebbit | 15 | 8 + 10 Run Energy | 23 |
| Dark Crab/Manta Ray | 22 | Moonlight Antelope Meat | 17 | 4 + 5 + Cure 1 Poison | 26 |
Unlocking the Culinary Secrets
- Access to Varlamore: Unlock Low Tier Meats (Wild Kebbit, Larupia, and Barbed Kebbit).
- 25 Rumours: Gain access to Mid Tier Meats (Graahk, Kyatt, and Fox).
- 50 Rumours: Earn the privilege of cooking High Tier Meats (Antelope and Dashing Kebbit).
Unveiling Varlamore's Stylish Arsenal:
The Hunter Guild in Varlamore is not just a hub for quests and culinary delights; it also introduces a set of stylish equipment and a unique ranged weapon to enhance your prowess on the Savannah. Gear up in the all-new Mixed Hide Gear and wield the distinctive Hunter's Spear as you venture into the wild.
Mixed Hide Gear
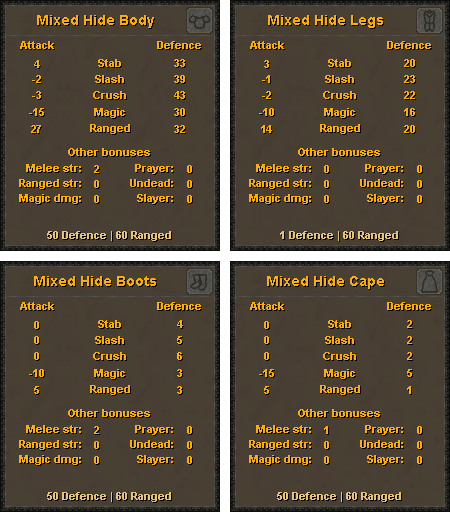
Requirements:
- Defense: 50
- Ranged: 60
Features:
- Ranged/Melee hybrid set.
- Provides a Defense advantage.
- Significant Strength-based Ranged gains.
Creation Process:
- Speak to a skilled artisan within the Hunter Guild to tan the hide and make it 'combat ready.'
- Crafted to match the aesthetics of Spiky Vambraces, offering a stylish mid-level option.
Embrace Varlamore's unique style with the Mixed Hide Gear, a versatile set that combines aesthetics with combat efficiency.
Hunter's Spear
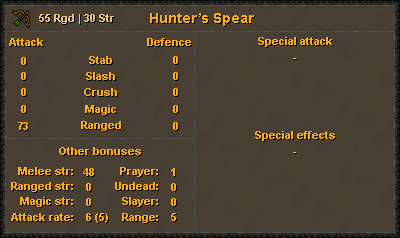
Features:
- Ranged weapon rolling damage based on Melee Strength.
- Consumable and compatible with Ava's Equipment line.
- Increased chance (+5%) to successfully tease creatures like Kyatt, Ghaark, and Larupia.
- Does not consume ammo when used against Chinchompas.
The Hunter's Spear is not just a weapon; it's a tool for precision and mastery in Varlamore's wild terrains. Tease creatures with ease and conserve ammo when facing the elusive Chinchompas.
Gear up, embrace style, and wield the Hunter's Spear as you embark on thrilling adventures in the vast and untamed landscapes of Varlamore!
Revitalizing Hunter:
As Varlamore unveils its wonders, we recognize the need to breathe new life into existing Hunter content. Here are exciting improvements and additions to elevate your hunting experience:
Hunter's Crossbow Evolution
- Upgrade Requirements:
- Sunlight Horns from Sunlight Antelopes.
- 66 Ranged, 50 Hunter to use.
- 74 Fletching to craft.
- Enhancements:
- +79 Ranged accuracy.
- 4 attack speed (3 on Rapid).
- New bolts crafted from Sunlight Antelope Horns:
- Sunlight Bolts: +55 Ranged strength.
- Moonlight Bolts: +60 Ranged strength.
Hunter's Pouches
- Crafting Requirements:
- Larupia Fur Pouch (35 Crafting, 4x Larupia Fur): Stores up to 14 furs.
- Graahk Fur Pouch (50 Crafting, Larupia Fur Pouch, 3x Graahk Fur): Stores up to 21 furs.
- Kyatt Fur Pouch (65 Crafting, Graahk Fur Pouch, 3x Kyatt Fur): Stores up to 28 furs.
- Fennec Meat Pouch (35 Crafting, 4x Fennec Fox Fur): Stores up to 14 raw Hunter meats.
- Antelope Meat Pouch (65 Crafting, Fennec Meat Pouch, 3x Antelope Fur): Stores up to 28 raw Hunter meats.
Hunter Outfits
- New Purpose:
- Damage reduction bonus against Hunter creatures.
- Larupia Set: 20% reduction.
- Graahk Set: 40% reduction.
- Kyatt Set: 60% reduction.
Hunter Camouflage Gear
- Enhancements:
- All Camouflage Tops: 3kg Weight Reduction.
- All Camouflage Legs: 2kg Weight Reduction.
Trap Storage
- Functionality:
- Store all Hunter tools ready for the next hunt.
- Specifically for traps; Knives, Axes, etc. still need to be brought along.
Implings:
- New Feature:
- Catch Implings barehanded without a Jar.
- Butterfly Net usage requires a Butterfly Jar.
These enhancements aim to make Hunter more engaging, organized, and rewarding. Embrace the improved tools and gear as you explore the vast hunting grounds of Varlamore!
New Varlamore Activities:
Varlamore beckons adventurers with diverse opportunities for skill enhancement. Uncover the mysteries and benefits of these smaller activities:
Colossal Wyrm (Agility)
- Requirement: 50 Agility
- Location: South of Civitas Illa Fortis
- Task: Assist Worm Tongue in eradicating termites.
Rewards at Worm Tongue's Store:
- Bone Shards: Stackable item for Prayer training.
- Basic/Advanced Teleport Crystals: Agility Dungeon transportation.
- Graceful Sewing Kit: Recolor Varlamore Graceful Kit.
- Amylase Crystals: Obtainable by grinding termites.
Bone Shard Mining (Mining)
- Requirement: 41 Mining
- Activity: Mine Bone Shards for worship across Varlamore.
- Bonuses:
- Waterfall events: 15% increased mining success.
- Calcified Deposits: Smash for Bone Shards or a Cam-Torum teleport.
Offerings to Ralos (Prayer)
- Requirement: Minimum 30 Prayer
- Process:
- Bring Bones → Bless Bones → Chip into Shards → Offer to Ralos.
- Use Jug of Wine to fill the Libation Pool for offerings.
- Sunfire Splinters change wine into Libation Wine (more XP, reduced max shards).
- Un-note bones for uninterrupted worship.
Pickpocketing, Breaking & Entering (Thieving)
- Requirement: 50 Thieving
- Bazaar Pickpocketing:
- High failure rate, but Street Urchin distractions ensure 100% success.{
- Gain coin pouches with chances for keys.
- Breaking & Entering:
- Steal keys and enter affluent homes for valuables.
- Beware of owners' return; being caught results in losses.
- High-value targets offer double loot drops and Ivory Figurines.
- Ivory Figurines can be traded at the Hunter's Guild or chipped into Bone Shards.
Embark on these skillful adventures in Varlamore, where every action unveils new opportunities and rewards!