OSRS Contact! Quest Guide

Contact! Quest Guide OSRS

Does VIRTGOLD offer Powerleveling Services for me?
Yes! In fact, our team of expert Powerlevelers has mastered every inch of efficient OSRS training methods, and we're ready to help you accomplish the same feat. Whether you're a seasoned adventurer or just starting out, our personalized approach ensures that you'll receive the most affordable prices and most skilled workers to come out on top. So why wait? Take on the grind of OSRS with confidence, thanks to VIRTGOLD. Want to skip the grind all together? Consider our other services such as Currency and Questing!

Details
Quest Required:
Prince Ali Rescue
Icthlarin's Little Helper
Items Required:
A light source (Kandarin headgear, Firemaking cape, Abyssal lantern or a bruma torch are extremely recommended as they can't be extinguished by traps in the dungeon). If you don't have one, the Sophanem guard under the temple of the lesser deities will sell you an unlit torch for 200 coins.
A tinderbox (unless you have the Kandarin headgear, Firemaking cape, Abyssal lantern or a bruma torch). If you don't have one, the Sophanem guard will sell you one for 50 coins.
Recommended:
 70 Combat level
 50 Agility
 50 Thieving
Antipoison potion
Combat equipment
Food
The Pharaoh's sceptre or a Nardah teleport (to get to Sophanem)
3 Nardah teleports to get to Nardah
An emergency escape teleport
Desert robes
Waterskins
A ring of dueling or amulet of glory (to quickly return to Al Kharid)
800 coins (if using Magic carpet transportation)
A Shantay pass (entry to the Kharidian Desert)
Prayer potions


Ok Let’s do this!
Getting Started
1. Speak to the High Priest:
- Begin the "Contact!" quest by traveling to Sophanem, a city located in the south-western part of the Kharidian Desert.
- Head to the Great Temple within Sophanem and speak with the High Priest, who resides there

- The High Priest will inform you about the city's struggle to establish contact with Menaphos, their sister city. Despite the evidence that the plague is not contagious, Menaphos remains quarantined and unresponsive.
- Offer your assistance, and the High Priest will express gratitude for your willingness to help. He will recount the recent conflict with Menaphite Guards at the bridge leading to Menaphos and explain the deteriorating relations between the two cities.
- The High Priest's main objective is to find a way to contact the Sophanites who are stuck in Menaphos to assure them that Sophanem is safe. Suggesting various ideas, the High Priest dismisses the notion of a Menaphite disguise, scaling the walls, or harming the guards. He directs you to the Temple of the Lesser Gods in the north-eastern part of the city to seek assistance from Jex, the caretaker.
2. Visit the Temple of the Lesser Gods:
- Make your way to the Temple of the Lesser Gods in the north-eastern corner of Sophanem. Inside the temple, you'll find a broken altar.
- Locate Jex, the temple's caretaker, and engage in a conversation with him.
- Jex will explain that the temple and its cellar, which housed a bank, were destroyed by strange scarab creatures that emerged from an underground dungeon a few months ago.
- He advises against entering the cave due to the dangers posed by vicious monsters and traps but agrees to help you. Jex blesses you and provides instructions on how to access the barricaded trapdoor beneath the temple.
- Ensure you have a light source before proceeding further.

Navigating the Dungeon
1. Talk to the Guard:
- After descending to the lower level of the dungeon, speak to a guard. They are guarding the trapdoor to prevent anything from escaping and to stop anyone from entering the dangerous cave system below, believed to be related to the ancient Sect of Scabaras.
- The guards will share some information about their absence during the plague outbreak and their pursuit of capturing Simon Templeton.
- You can purchase a torch for 200 coins and a tinderbox for 50 coins from the guards. It's strongly recommended to bring along essential items, including good food, a tinderbox, a light source, an antipoison potion, and an emergency teleport, such as the ectophial. Avoid bringing valuable items due to the risk of death.
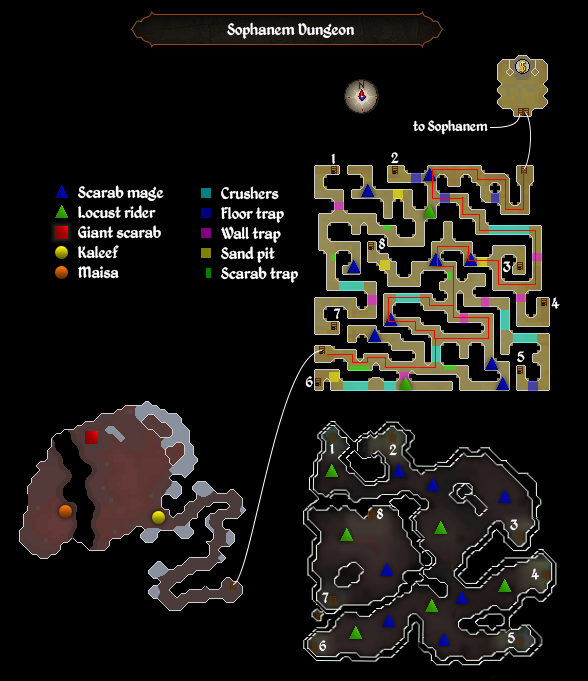
2. Traps and Dangers:
- The dungeon is filled with traps and dangerous creatures. Here are some details to help you navigate safely:
- Floor Trap - Spikes: These traps can be avoided by using Agility and selecting the "Evade Trap" option. Running over them will deal damage based on your current hitpoints.
- Wall Trap: Similar to the traps in the Rogues' Den, you can disable them by using Thieving and selecting the "Disable Trap" option. Running into them will also deal damage based on your current hitpoints.
- Wall Crusher: Move diagonally around these traps to avoid taking damage. Running into them will deal a fixed amount of damage.

- Sand Pits: These are barely visible circles on the ground. Stepping on them will release a Scarab swarm. Avoid them by walking around the pits.

- Scarab Trap: Stand away from wall spots with a scarab symbol, as these can extinguish your light source and cause you to fall to the bottom level of the dungeon.

3. Combat Tips:
- Consider turning off auto-retaliate through the combat tab to avoid unnecessary combat and conserve Prayer points.
- If you're following the route to the right, you'll encounter scarab mages. Use the Protect from Magic prayer and keep auto-retaliate off. Scarab mages hit hard but slowly, so you can time your movements to pass them without taking much damage.
- Locust riders use ranged attacks and hit hard as well. Use protection prayers and avoid auto-retaliate.
4. Choosing Ladders:
- Be cautious when using ladders in the dungeon. Going down the wrong ladder or falling into a pit will place you in a much more dangerous lower level with higher-level monsters.
- If you end up in the lower level, quickly find a ladder to escape or use an emergency teleport to exit.
5. Light Source:
- Your light source can be extinguished randomly in this area, even if you have a bullseye lantern. Carry a tinderbox to relight it in case this happens. The firemaking cape light source cannot be extinguished.
Discovering Kaleef's Notes and Meeting Maisa
1. Find Kaleef's Body:
- After choosing the correct ladder (the one directly north of the south-westernmost ladder), follow the passage until you reach the corpse of Kaleef. This location unlocks a new music track.

- Search Kaleef's body to obtain his notes.
2. Read Kaleef's Notes:
- Read the notes obtained from Kaleef's body. These notes contain orders from 'Os' instructing Kaleef to contact an agent inside Menaphos using the Scabarite tunnels beneath the Temple of the Lesser Gods.
3. Meet Maisa:
- Go slightly west from Kaleef's location to find Maisa, a woman standing at the other end of a chasm.
- Inform Maisa about Kaleef's death, which will cause her to cry and express her frustration with Osman, the Spymaster of Al Kharid.
- Maisa wishes to return home but needed Kaleef's assistance for that. To gain her trust, mention that you helped rescue Prince Ali, who was held in Draynor Village, and that Leela assisted you. This should convince her to cooperate.
4. Maisa's Cooperation:
- Once Maisa trusts you, she agrees to cooperate and instructs you to inform Osman to come to the cave.
- She emphasizes that Osman himself should come, not one of his agents.
Convincing Osman and Planning for the Future
1. Speak to Osman in Al Kharid:
- Travel to Al Kharid and locate Osman outside the palace.
- Initially, Osman will be skeptical of your claim about speaking to Maisa, believing she is locked inside Menaphos due to his actions. He mentions that his agents contributed to the civil unrest in Menaphos.
2. Inform Osman About Kaleef and Maisa:
- Explain the situation with Kaleef's death and Maisa's desire to return home.
- Osman will agree to send one of his agents to the dungeon but refuses to go himself, citing the historical conflict between Al Kharid and Menaphos and his role as the Spy Master.
3. Present the Plan for Reopening Sophanem:
- Share the information that the plague of Sophanem is not contagious and that the High Priest wishes to reopen the town and allow its inhabitants to return from Menaphos.
- Osman questions why he should help an enemy city. Attempts to convince him through excitement, spying, or the promise of treasure do not work, but the idea of creating division between Sophanem and Menaphos appeals to him.
4. Osman's Agreement:
- Osman agrees to help with the plan but prefers to meet you at the gates of Sophanem after dealing with some other matters.
5. Prepare for a Fight:
- Before traveling back to Sophanem, ensure you are well-equipped for combat and another journey through the tunnels.
- Bring good food, prayer potions, and your light source.
- Super potion sets are recommended if you plan to use melee.
- Spells like Iban Blast and Ice Rush can be effective.
6. Meet Osman in Sophanem:
- Return to Sophanem, and Osman will be waiting just outside the city gates.
- Suggest the secret entrance north of the city for Osman to enter unnoticed.
- Osman decides to split up to avoid detection and enters Sophanem on his own.
- You decide to search for Osman inside the cave.
Confronting the Giant Scarab
1. Optional: Talk to Jex:
- If you wish, speak to Jex for amusing dialogue about his encounter with a "degenerate" he suspects to be Siamun. He also mentions the damaged state of his temple and Simon Templeton's involvement.
2. Return to the Sophanem Dungeon:
- Head back through the Sophanem Dungeon to the location where you found Kaleef's body.
3. Witness the Cutscene:
- Upon descending the ladder, a cutscene will trigger. In this scene, Osman is seen talking to Maisa across the chasm, urging her to remain disguised.
- Suddenly, the cave begins to shake, and Maisa flees into Menaphos. Osman is surrounded by scarab swarms emerging from cracks in the ground, which merge into one giant scarab that attacks him.
- Osman appears to be knocked out and disappears from view.
4. Fight the Giant Scarab:
- Head further into the cave and confront the level 191 giant scarab. It can hit up to 20 with melee and ranged attacks, and its ranged attack resembles earth blast.
- Keep an eye on your hitpoints, as the scarab can poison you through an anti-poison potion.
- The scarab can summon level 68 Locust riders and Scarab mages to aid it, which will attack with all three combat styles (melee, ranged, and magic) simultaneously.
- Recommended combat strategies:
- Melee: Use Protect from Melee prayer and bring high-level gear (70+ stats). Have plenty of food, including sharks and prayer potions. You may need prayer protection due to the scarab's high defense.
- Ranged: Use a rune crossbow with broad bolts or higher-tier ammunition, or a crystal bow. Wear Karil's or black dragonhide armor. Protect from Missiles prayer is useful.
- Magic: Utilize safespots in the cave, such as near Kaleef's corpse. Use Protect from Missiles prayer and Mystic robes with Iban Blast for optimal results.
5. Focus on the Scarab:
- Prioritize attacking the scarab, but deal with the summoned minions (Locust riders and Scarab mages) as they appear.
- Continuously spawn minions throughout the fight, so it's essential to manage them effectively.
- Note that you cannot use a cannon during this battle.
6. Defeat the Scarab:
- Continue fighting the giant scarab while managing your health and prayer points.
- Once you defeat the scarab, proceed with the quest storyline.
After Defeating the Giant Scarab
1. Defeat the Scarab and Minions:
- Once you've successfully defeated the giant scarab, any remaining Scabarites will perish, and the three scarab swarms will disappear.
2. Osman's Return:
- Osman reappears, disheveled but alive. He informs you that the situation was under control and thanks you for your assistance.
3. Obtain the Keris Dagger:
- Osman directs you to pick up the Keris dagger on the floor. This dagger was used by Kaleef to pierce the scarab's shell from behind.
4. Osman's Departure:
- After providing you with the dagger, Osman teleports away, concluding his involvement in the quest.
5. Return to Sophanem:
- Travel back to Sophanem, where the townsfolk from Menaphos have returned, and the city is slowly returning to normalcy.
6. Speak to the High Priest:
- Visit the High Priest again to report the successful outcome of your mission. He will confirm Maisa's success and reward you with a magic lamp granting two wishes.
Congratulations! Quest Complete!
