Gundrak Dungeon Bosses Guide WotLK

Gundrak Dungeon Boss Guide WotLK
Welcome to our comprehensive guide covering all the bosses found within Gundrak Dungeon in Wrath of the Lich King Classic, including strategies for both Normal and Heroic difficulties. Below, you'll find detailed information on each boss encounter, along with valuable tips to help your group conquer these challenges.
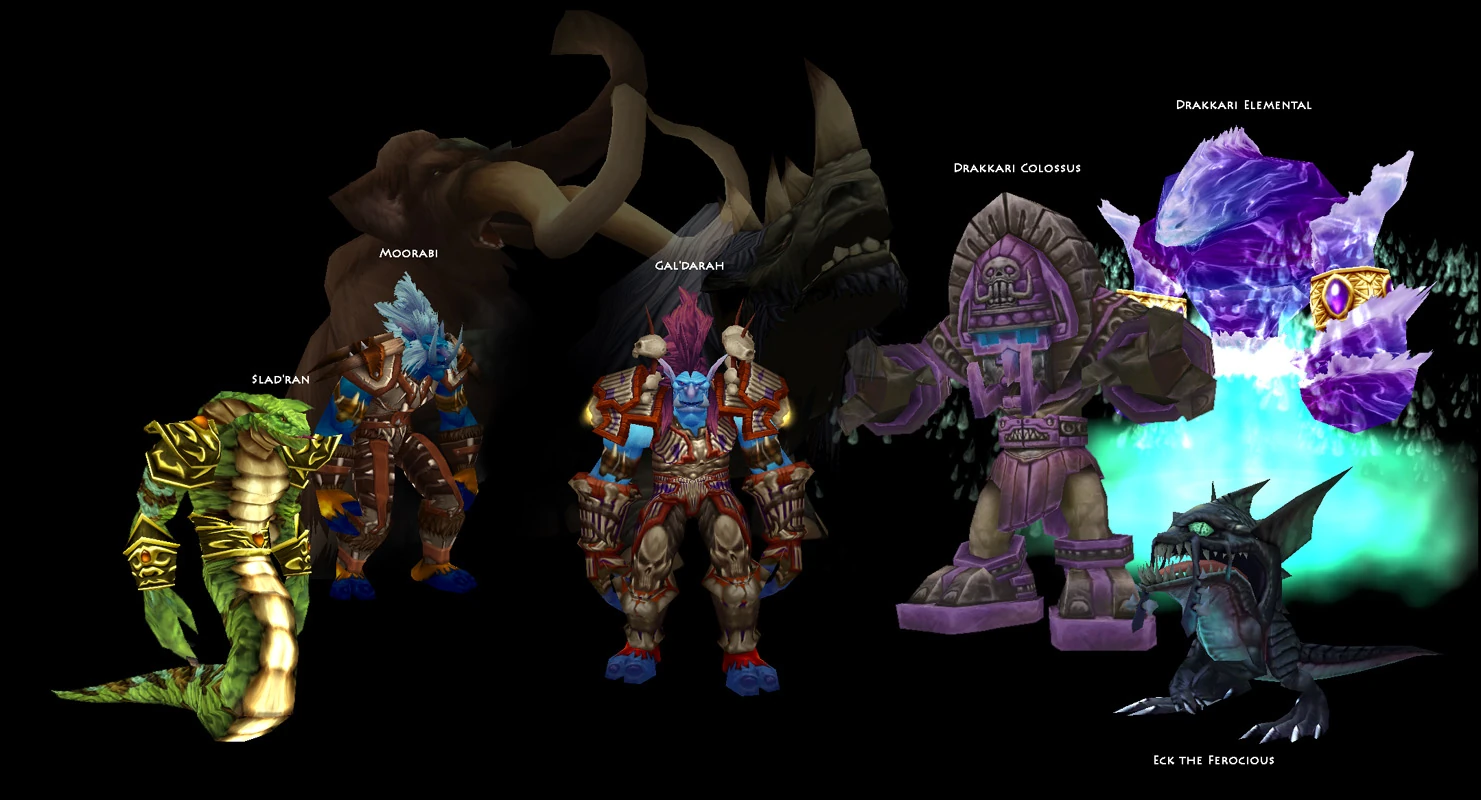
Slad'ran

Overview: Slad'ran is a formidable serpent boss found early in Gundrak. He primarily relies on poison-based attacks and summons additional serpents to aid him in battle.
Slad'ran: Primary Abilities
- Poison Nova: Slad'ran releases a toxic explosion, dealing 2,590 to 3,010 Nature damage to nearby enemies. Additionally, affected targets suffer a debuff, taking 1,064 to 1,236 Nature damage every 2 seconds for 16 seconds.
- Powerful Bite: Slad'ran delivers a potent bite, dealing 100% of normal damage to the target. Furthermore, this attack reduces the target's armor by 20% for 5 seconds.
- Venom Bolt: Slad'ran launches a venomous bolt at a single enemy, inflicting 2,313 to 2,687 Nature damage upon impact.
Slad'ran Tips and Strategies
1. Positioning: Tanks should maintain Slad'ran away from the group, especially during Poison Nova casts, to minimize damage to nearby players. Placing him atop the stairs can also hinder the movement of subsequent adds.
2. Avoid Poison Nova: When Slad'ran prepares to cast Poison Nova, move away promptly to avoid taking substantial damage. Utilize Line of Sight (LoS) tactics to minimize the risk of being hit.
3. Manage Debuffs: Healers should be prepared to address the periodic Nature damage inflicted by Slad'ran's Poison Nova debuff. Monitor affected players and prioritize healing as necessary.
4. Interrupt Venom Bolt: DPS should prioritize interrupting Slad'ran's Venom Bolt casts to reduce incoming damage. Assign interrupt rotations or use crowd control abilities effectively.
Drakkari Colossus/Elemental
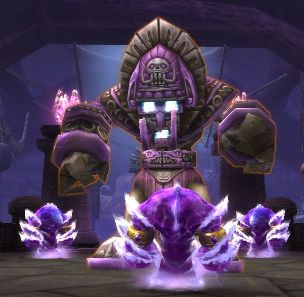
Overview: The Drakkari Colossus is a massive construct that poses a significant threat to any group. He utilizes powerful melee attacks and periodically summons smaller Drakkari constructs to aid him.
Drakkari Colossus/Elemental: Primary Abilities
Drakkari Colossus:
1. Mighty Blow: Unleashes a powerful strike, dealing 175% of normal damage to a single enemy.
2. Emerge: Transforms into the Drakkari Elemental, initiating a shift in combat dynamics.
Drakkari Elemental:
1. Surge: Charges a random player, causing physical damage to anyone in its path.
2. Merge: Transforms back into the Drakkari Colossus, altering its abilities.
Drakkari Colossus/Elemental Tips and Strategies
1. Two-Faced Fight: This encounter involves combatting the same mob in two distinct forms. Players need to adapt to the abilities of both the Drakkari Colossus and the Drakkari Elemental.
2. Avoid Purple Puddles: Be cautious of purple puddles caused by adds. These pools deal substantial damage to players standing in them. Steer clear of these areas to minimize damage taken.
3. Positioning: Tanks should position the Drakkari Colossus away from the group to mitigate the impact of its powerful Mighty Blow. Adjust positioning as needed during the Elemental phase to avoid unnecessary damage from Surge.
4. DPS Focus: DPS should prioritize burning down the smaller adds when they appear, preventing the creation of additional harmful pools. Efficiently dispatch these adds to maintain control over the battlefield.
5. Healing Awareness: Healers need to be vigilant, especially during transitions between the Drakkari Colossus and Elemental. Adjust healing priorities based on the phase and be prepared for increased damage during Surge.
Moorabi

Overview: Moorabi is a fearsome ice troll boss who relies on frost-based attacks to freeze and damage his enemies. He also has the ability to transform into a massive yeti, increasing his damage output significantly.
Moorabi: Primary Abilities
1. Determined Gore: Inflicts 2,338 to 3,162 physical damage and applies a bleed effect, causing 400 damage every second for 21 seconds.
2. Determined Stab: Deals 2,338 to 3,162 physical damage to the target.
3. Numbing Shout: Reduces enemies' spell casting speed by 25% for 5 seconds.
4. Mojo Frenzy: Increases casting speed proportionally with the amount of damage taken.
5. Transformation: Attempts to transform into a mammoth, succeeding if uninterrupted. Successful transformation increases damage by 25% and grants immunity to stun effects.
Moorabi Tips and Strategies
1. Average Damage: Moorabi deals a moderate amount of damage to the tank and nearby players. Healers should be prepared for sustained damage throughout the encounter.
2. Casting Speed: The more damage Moorabi takes, the faster he can cast spells. Healers should adjust their focus based on Moorabi's health and be prepared for increased casting speed as the fight progresses.
3. Interrupts and Stuns: Moorabi attempts to transform into a mammoth, enhancing his damage. Players should be ready to use interrupts, stuns, or other crowd control abilities to prevent the transformation and mitigate the increased threat.
4. Positioning: Tanks should position Moorabi away from the group to minimize the impact of his frontal cone attacks, particularly the Determined Gore ability.
5. Cooldown Management: DPS and tanks should manage their defensive cooldowns during moments of high damage output, such as when Moorabi is in Mojo Frenzy or during the attempted transformation.
Gal'darah

Overview: Gal'darah is the final boss of Gundrak and presents a formidable challenge to any group. He utilizes both physical and nature-based attacks, as well as summoning powerful dire trolls to aid him in battle.
Gal'darah: Primary Abilities
1. Whirling Slash: Inflicts 2,828 to 3,172 physical damage to nearby enemies and applies a bleed effect, causing 1,000 damage every 3 seconds for 6 seconds.
2. Stampede: Summons a Spirit Rhino that charges a player, dealing 4,713 to 5,287 physical damage.
Rhino Abilities:
- Impaling Charge: Charges a target, inflicting normal damage plus 750.
- Puncture: Inflicts 4,713 to 5,287 physical damage to a target, ignoring armor. Applies a bleed effect, causing 500 damage every 3 seconds for 2 minutes.
- Stomp: Deals 4,713 to 5,287 physical damage to everyone and knocks them away.
- Enrage: Increases attack speed by 100% for 8 seconds.
Gal'darah Tips and Strategies
1. Melee Awareness: Gal'darah deals significant damage to nearby players, particularly during abilities like Whirling Slash. Melee DPS should promptly move away to minimize damage taken during these AoE attacks.
2. Rhino Transformation: Gal'darah periodically transforms into a rhino, impaling a random player and rendering them unable to act. The victim also suffers constant damage during this duration. Players should be ready to adjust their positions accordingly.
3. Tank Healing: Healers need to be prepared for Gal'darah's occasional huge damage spikes. Ensure the tank is receiving sufficient healing, especially during abilities like Stampede and Whirling Slash.
4. Interrupt or CC: Consider using interrupts or crowd control abilities on the Spirit Rhino adds to reduce the overall damage taken by the group. Puncture, in particular, inflicts significant damage over time and should be mitigated.
5. Positioning: Tanks should position Gal'darah appropriately to minimize the impact of his abilities on the group, especially during Whirling Slash.
Eck the Ferocious

Overview: Eck the Ferocious, a gorloc, is an optional boss in Gundrak, only accessible in Heroic mode. It is tied to the achievement What the Eck?.
Eck the Ferocious: Primary Abilities
1. Eck Spit: Applies a debuff to everyone in front of him, inflicting 2,970 Nature damage and draining 220 Mana every second for 3 seconds.
2. Eck Bite: Inflicts 150% normal damage to his target.
3. Eck Spring: Jumps to a nearby player, dropping aggro and attacking that player instead.
4. Eck Berserk: Increases attack speed by 150% and damage done by 500%. Activated after approximately 60 to 90 seconds into the fight.
Eck the Ferocious Tips and Strategies
1. Delayed Engagement: The fight against Eck does not initiate until engaging him in combat. Make sure the group is ready before initiating the encounter.
2. Tank Positioning: The tank should position Eck facing away from the rest of the group to avoid the impact of his frontal cone attacks, especially during abilities like Eck Spit.
3. Aggro Management: When Eck uses Eck Spring, he drops aggro and starts attacking another player. The tank needs to taunt him back promptly to regain control. DPS and healers should be cautious not to generate excessive threat during this phase.
4. Interrupt or Dispel: Consider using interrupts or dispel abilities to manage the negative effects of Eck Spit, particularly the mana drain, which can be detrimental to spellcasters.
5. Berserk Phase: Be prepared for Eck's Berserk phase, which significantly increases his attack speed and damage output. Tanks should activate defensive cooldowns, and healers should be ready for a spike in damage during this period.